一、为什么需要虚拟DOM
先介绍浏览器加载一个
HTML文件需要做哪些事,帮助我们理解为什么我们需要虚拟DOM。webkit引擎的处理流程

出错的图片链接: https://s.poetries.work/gitee/2019/10/605.png
所有浏览器的引擎工作流程都差不多,如上图大致分5步:创建
DOM tree–> 创建Style Rules-> 构建Render tree-> 布局Layout–> 绘制Painting
- 第一步,用
HTML分析器,分析HTML元素,构建一颗DOM树。 - 第二步:用
CSS分析器,分析CSS文件和元素上的inline样式,生成页面的样式表。 - 第三步:将上面的
DOM树和样式表,关联起来,构建一颗Render树。这一过程又称为Attachment。每个DOM节点都有attach方法,接受样式信息,返回一个render对象(又名renderer)。这些render对象最终会被构建成一颗Render树。 - 第四步:有了
Render树后,浏览器开始布局,会为每个Render树上的节点确定一个在显示屏上出现的精确坐标值。 - 第五步:
Render数有了,节点显示的位置坐标也有了,最后就是调用每个节点的paint方法,让它们显示出来。
当你用传统的源生
api或jQuery去操作DOM时,浏览器会从构建DOM树开始从头到尾执行一遍流程。比如当你在一次操作时,需要更新10个DOM节点,理想状态是一次性构建完DOM树,再执行后续操作。但浏览器没这么智能,收到第一个更新DOM请求后,并不知道后续还有9次更新操作,因此会马上执行流程,最终执行10次流程。显然例如计算DOM节点的坐标值等都是白白浪费性能,可能这次计算完,紧接着的下一个DOM更新请求,这个节点的坐标值就变了,前面的一次计算是无用功。
- 即使计算机硬件一直在更新迭代,操作
DOM的代价仍旧是昂贵的,频繁操作还是会出现页面卡顿,影响用户的体验。真实的DOM节点,哪怕一个最简单的div也包含着很多属性,可以打印出来直观感受一下

虚拟
DOM就是为了解决这个浏览器性能问题而被设计出来的。例如前面的例子,假如一次操作中有10次更新DOM的动作,虚拟DOM不会立即操作DOM,而是将这10次更新的diff内容保存到本地的一个js对象中,最终将这个js对象一次性attach到DOM树上,通知浏览器去执行绘制工作,这样可以避免大量的无谓的计算量
二、实现虚拟DOM
    <div id="real-container">
        <p>Real DOM</p>
        <div>cannot update</div>
        <ul>
            <li className="item">Item 1</li>
            <li className="item">Item 2</li>
            <li className="item">Item 3</li>
        </ul>
    </div>
用
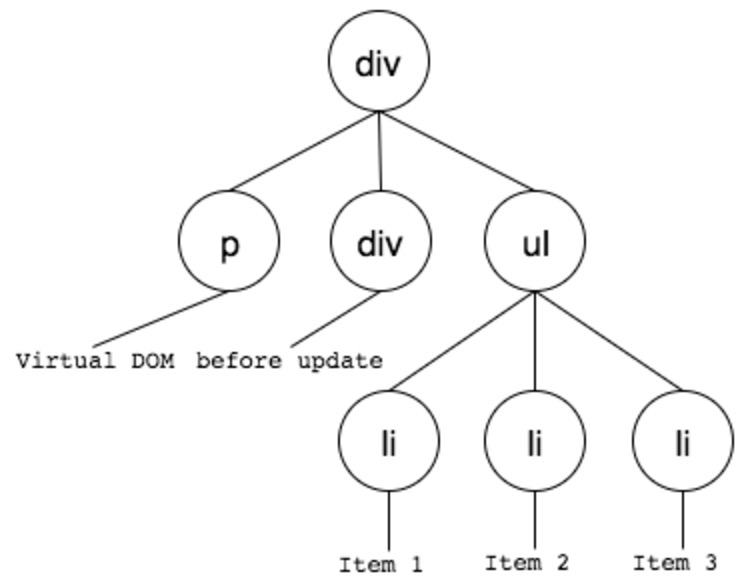
js对象来模拟DOM节点如下
    const tree = Element('div', { id: 'virtual-container' }, [
        Element('p', {}, ['Virtual DOM']),
        Element('div', {}, ['before update']),
        Element('ul', {}, [
            Element('li', { class: 'item' }, ['Item 1']),
            Element('li', { class: 'item' }, ['Item 2']),
            Element('li', { class: 'item' }, ['Item 3']),
        ]),
    ]);

    const root = tree.render();
    document.getElementById('virtualDom').appendChild(root);
用
js对象模拟DOM节点的好处是,页面的更新可以先全部反映在js对象上,操作内存中的js对象的速度显然要快多了。等更新完后,再将最终的js对象映射成真实的DOM,交由浏览器去绘制
    function Element(tagName, props, children) {
        if (!(this instanceof Element)) {
            return new Element(tagName, props, children);
        }

        this.tagName = tagName;
        this.props = props || {};
        this.children = children || [];
        this.key = props ? props.key : undefined;

        let count = 0;
        this.children.forEach((child) => {
            if (child instanceof Element) {
                count += child.count;
            }
            count++;
        });
        this.count = count;
    }
第一个参数是节点名(如
div),第二个参数是节点的属性(如class),第三个参数是子节点(如ul的li)。除了这三个参数会被保存在对象上外,还保存了key和count
有了
js对象后,最终还需要将其映射成真实的DOM
    Element.prototype.render = function() {
        const el = document.createElement(this.tagName);
        const props = this.props;

        for (const propName in props) {
            setAttr(el, propName, props[propName]);
        }

        this.children.forEach((child) => {
            const childEl = (child instanceof Element) ? child.render() : document.createTextNode(child);
            el.appendChild(childEl);
        });

        return el;
    };
根据
DOM名调用源生的createElement创建真实DOM,将DOM的属性全都加到这个DOM元素上,如果有子元素继续递归调用创建子元素,并appendChild挂到该DOM元素上。这样就完成了从创建虚拟DOM到将其映射成真实DOM的全部工作
三、Diff算法
我们已经完成了创建虚拟
DOM并将其映射成真实DOM的工作,这样所有的更新都可以先反映到虚拟DOM上,如何反映呢?需要明确一下Diff算法
- 两棵树如果完全比较时间复杂度是
O(n^3) React的Diff算法的时间复杂度是O(n)。要实现这么低的时间复杂度,意味着只能平层地比较两棵树的节点,放弃了深度遍历- 这样做,似乎牺牲了一定的精确性来换取速度,但考虑到现实中前端页面通常也不会跨层级移动
DOM元素,所以这样做是最优的。
我们新创建一棵树,用于和之前的树进行比较
    const newTree = Element('div', { id: 'virtual-container' }, [
        Element('h3', {}, ['Virtual DOM']),                     // REPLACE
        Element('div', {}, ['after update']),                   // TEXT
        Element('ul', { class: 'marginLeft10' }, [              // PROPS
            Element('li', { class: 'item' }, ['Item 1']),
            // Element('li', { class: 'item' }, ['Item 2']),    // REORDER remove
            Element('li', { class: 'item' }, ['Item 3']),
        ]),
    ]);
只考虑平层地Diff的话,就简单多了,只需要考虑以下4种情况
第一种是最简单的,节点类型变了,例如下图中的
P变成了h3。我们将这个过程称之为REPLACE。直接将旧节点卸载(componentWillUnmount)并装载新节点(componentWillMount)就行了
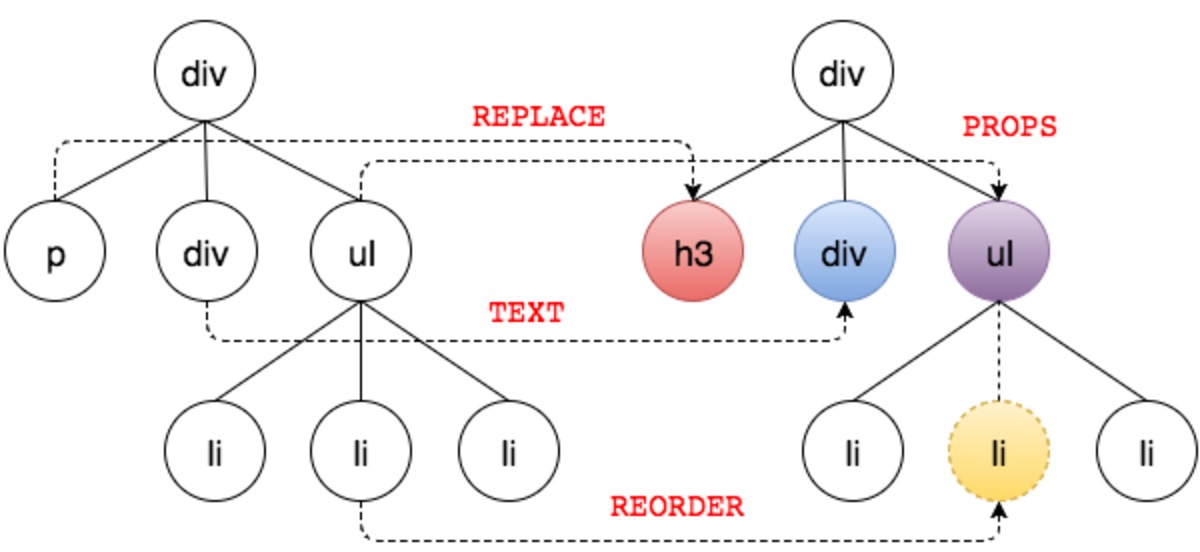
旧节点包括下面的子节点都将被卸载,如果新节点和旧节点仅仅是类型不同,但下面的所有子节点都一样时,这样做显得效率不高。但为了避免O(n^3)的时间复杂度,这样做是值得的。这也提醒了React开发者,应该避免无谓的节点类型的变化,例如运行时将div变成p就没什么太大意义
第二种也比较简单,节点类型一样,仅仅属性或属性值变了
    renderA: <ul>
    renderB: <ul class: 'marginLeft10'>
    => [addAttribute class "marginLeft10"]
我们将这个过程称之为
PROPS。此时不会触发节点的卸载(componentWillUnmount)和装载(componentWillMount)动作。而是执行节点更新(shouldComponentUpdate到componentDidUpdate的一系列方法)
    function diffProps(oldNode, newNode) {
        const oldProps = oldNode.props;
        const newProps = newNode.props;

        let key;
        const propsPatches = {};
        let isSame = true;

        // find out different props
        for (key in oldProps) {
            if (newProps[key] !== oldProps[key]) {
                isSame = false;
                propsPatches[key] = newProps[key];
            }
        }

        // find out new props
        for (key in newProps) {
            if (!oldProps.hasOwnProperty(key)) {
                isSame = false;
                propsPatches[key] = newProps[key];
            }
        }

        return isSame ? null : propsPatches;
    }
- 第三种是文本变了,文本对也是一个
Text Node,也比较简单,直接修改文字内容就行了,我们将这个过程称之为TEXT - 第四种是移动,增加,删除子节点,我们将这个过程称之为
REORDER
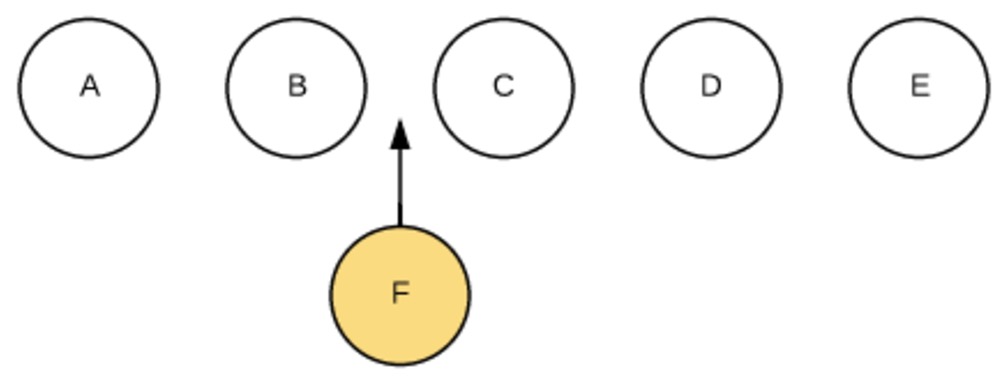
在中间插入一个节点,程序员写代码很简单:$(B).after(F)。但如何高效地插入呢?简单粗暴的做法是:卸载C,装载F,卸载D,装载C,卸载E,装载D,装载E。如下图
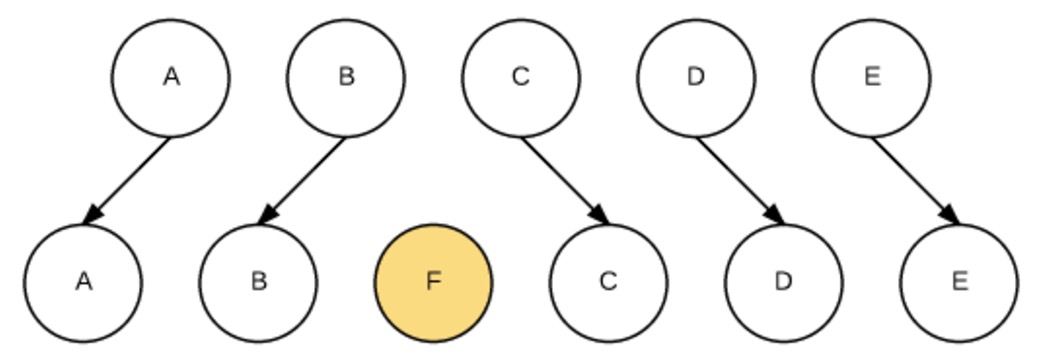
我们写
JSX代码时,如果没有给数组或枚举类型定义一个key,就会看到下面这样的warning。React提醒我们,没有key的话,涉及到移动,增加,删除子节点的操作时,就会用上面那种简单粗暴的做法来更新。虽然程序运行不会有错,但效率太低,因此React会给我们一个warning

如果我们在
JSX里为数组或枚举型元素增加上key后,React就能根据key,直接找到具体的位置进行操作,效率比较高。如下图
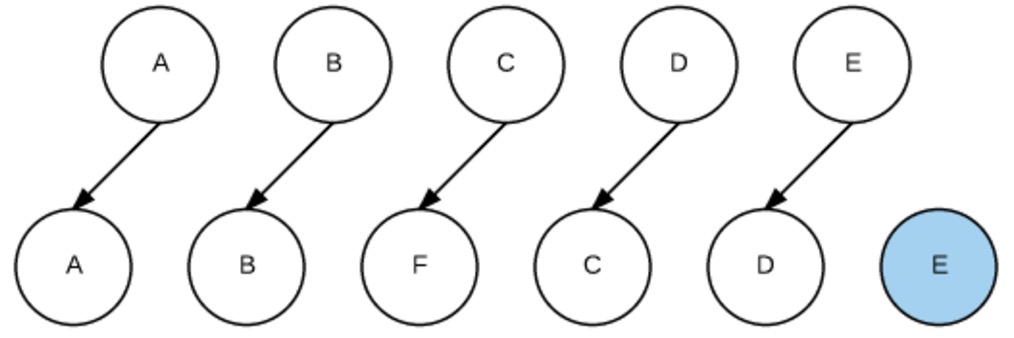
常见的最小编辑距离问题,可以用
Levenshtein Distance算法来实现,时间复杂度是O(M*N),但通常我们只要一些简单的移动就能满足需要,降低点精确性,将时间复杂度降低到O(max(M, N)即可
最终Diff出来的结果如下
    {
        1: [ {type: REPLACE, node: Element} ],
        4: [ {type: TEXT, content: "after update"} ],
        5: [ {type: PROPS, props: {class: "marginLeft10"}}, {type: REORDER, moves: [{index: 2, type: 0}]} ],
        6: [ {type: REORDER, moves: [{index: 2, type: 0}]} ],
        8: [ {type: REORDER, moves: [{index: 2, type: 0}]} ],
        9: [ {type: TEXT, content: "Item 3"} ],
    }
四、映射成真实DOM
虚拟
DOM有了,Diff也有了,现在就可以将Diff应用到真实DOM上了
深度遍历DOM将Diff的内容更新进去
    function dfsWalk(node, walker, patches) {
        const currentPatches = patches[walker.index];

        const len = node.childNodes ? node.childNodes.length : 0;
        for (let i = 0; i < len; i++) {
            walker.index++;
            dfsWalk(node.childNodes[i], walker, patches);
        }

        if (currentPatches) {
            applyPatches(node, currentPatches);
        }
    }
具体更新的代码如下,其实就是根据
Diff信息调用源生API操作DOM
    function applyPatches(node, currentPatches) {
        currentPatches.forEach((currentPatch) => {
            switch (currentPatch.type) {
                case REPLACE: {
                    const newNode = (typeof currentPatch.node === 'string')
                        ? document.createTextNode(currentPatch.node)
                        : currentPatch.node.render();
                    node.parentNode.replaceChild(newNode, node);
                    break;
                }
                case REORDER:
                    reorderChildren(node, currentPatch.moves);
                    break;
                case PROPS:
                    setProps(node, currentPatch.props);
                    break;
                case TEXT:
                    if (node.textContent) {
                        node.textContent = currentPatch.content;
                    } else {
                        // ie
                        node.nodeValue = currentPatch.content;
                    }
                    break;
                default:
                    throw new Error(`Unknown patch type ${currentPatch.type}`);
            }
        });
    }
虚拟
DOM的目的是将所有操作累加起来,统计计算出所有的变化后,统一更新一次`DOM
阅读全文
